Custom AAD Invite using Azure Logic Apps
The Azure AD default invitation email is ugly and bad. Can we do something better?
Setting up an application that requires inviting external users into our Azure Active Directory (AAD) tenant might sound straightforward, right? Well, mostly. Inviting users manually from the Azure portal is a breeze—just head to the AAD user blade, click ‘New User,’ select the option to invite external users, fill in an email address and some basic information, and you’re good to go. Simple enough! However, the challenge lies in the email that the external user receives by default.
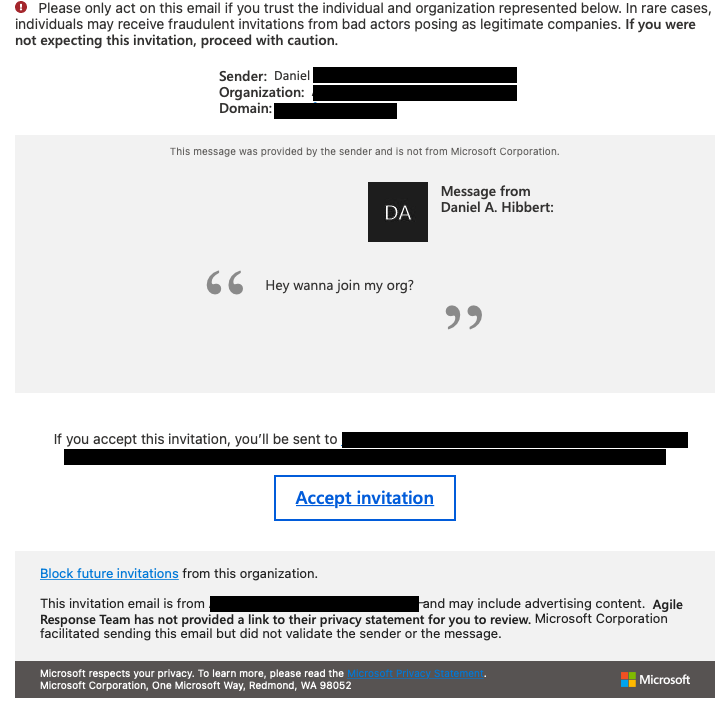
Look at this thing 🤮. Line after line of small detailed text. Text that is easy to understand and not at all scary (/s). No branding for the source organization or application. For my uses the default email is a non-starter.
That fact got me headed down the road to find what options are available to invite extneral users into AAD.
- Without the need to manually create invitations through the Azure portal.
- Send an email notification with organization and application branding with a link to complete the B2B onboading process.
Thankfully, the search did not take that long. Combining the Microsoft Graph API with an Azure LogicApp will cover all my bases.
Microsoft Graph
For the first part of the solution we turn to a favorite, the Microsoft Graph API. Using the Invitation Manager methods in Microsoft Graph enables me to automate the creation of an invitation, and manage additional option in the process.
Invitation Manager
Invitation Manager will take care of creating the invite. The cool, and useful part is this process is the option to choose not to sending the default invitation email. Instead you are provided the redemtion URL to do with as you please.
Example payload
An example of the request payload to Microsoft Graph to create an invitation.
{
  "inviteRedirectUrl": <SOME URL>,
  "invitedUserDisplayName": Joe P. Public,
  "invitedUserEmailAddress": Joe@public.something,
  "sendInvitationMessage": false
}
|---|---| |inviteRedirectUrl|The URL the user will be redirect to after the invitation is accepted, and onboarding is complete. Can be any URL that you want to send the user to, does not have to be a Microsoft site.| |invitedUserDisplayName|External user display name| |initedUserEmailAddress|External user email address| |sendInvitationMessage|[true:false] Send invitation email to external user? (We want to say False)
Example response
The response back from Graph.
HTTP/1.1 201 Created
Content-type: application/json

{
  "@odata.context": "https://graph.microsoft.com/v1.0/$metadata#invitations/$entity",
  "id": "7b92124c-9fa9-406f-8b8e-225df8376ba9",
  "inviteRedeemUrl": "https://invitations.microsoft.com/redeem/?tenant=04dcc6ab-388a-4559-b527-fbec656300ea&user=7b92124c-9fa9-406f-8b8e-225df8376ba9&ticket=VV9dmiExBsfRIVNFjb9ITj9VXAd07Ypv4gTg%2f8PiuJs%3d&lc=1033&ver=2.0",
  "invitedUserDisplayName": "Fabrikam Admin",
  "invitedUserEmailAddress": "admin@fabrikam.com",
  "resetRedemption": false,
  "sendInvitationMessage": false,
  "inviteRedirectUrl": "https://myapp.contoso.com",
  "status": "Completed",
  "invitedUser": { "id": "243b1de4-ad9f-421c-a933-d55305fb165d" }
}
The important parts of this response we need for the next step(s) are:
|---|---| |inviteRedeemUrl|URL to accept the invitation request|
Logic App
Tying it all together with one of my favorite tools from the bag, an Azure Logic App. The Logic App can host all of the calls between services, generating a custom email, and sending everything out to the intended recipient.
Trigger
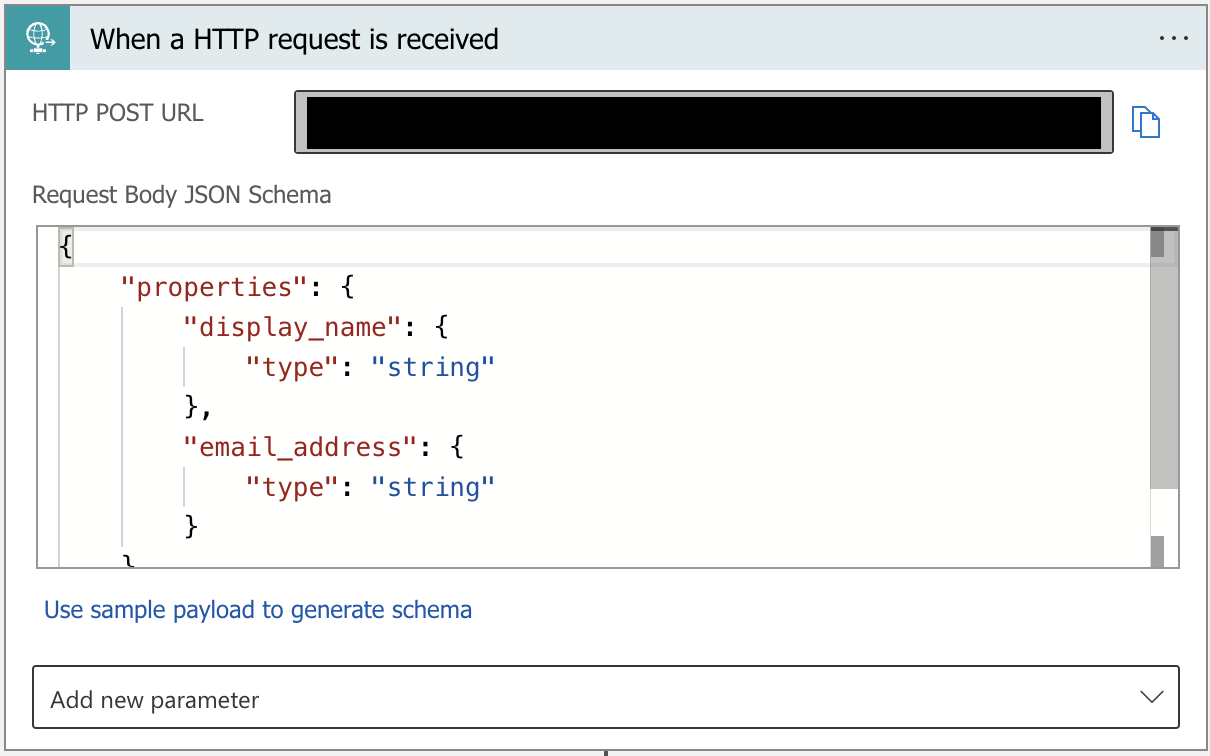
Create Invitation
Using an HTTP task to call the Graph API to generate an invitation for the external user. This will generate the link the external user will use to complete the registration and onboarding process.
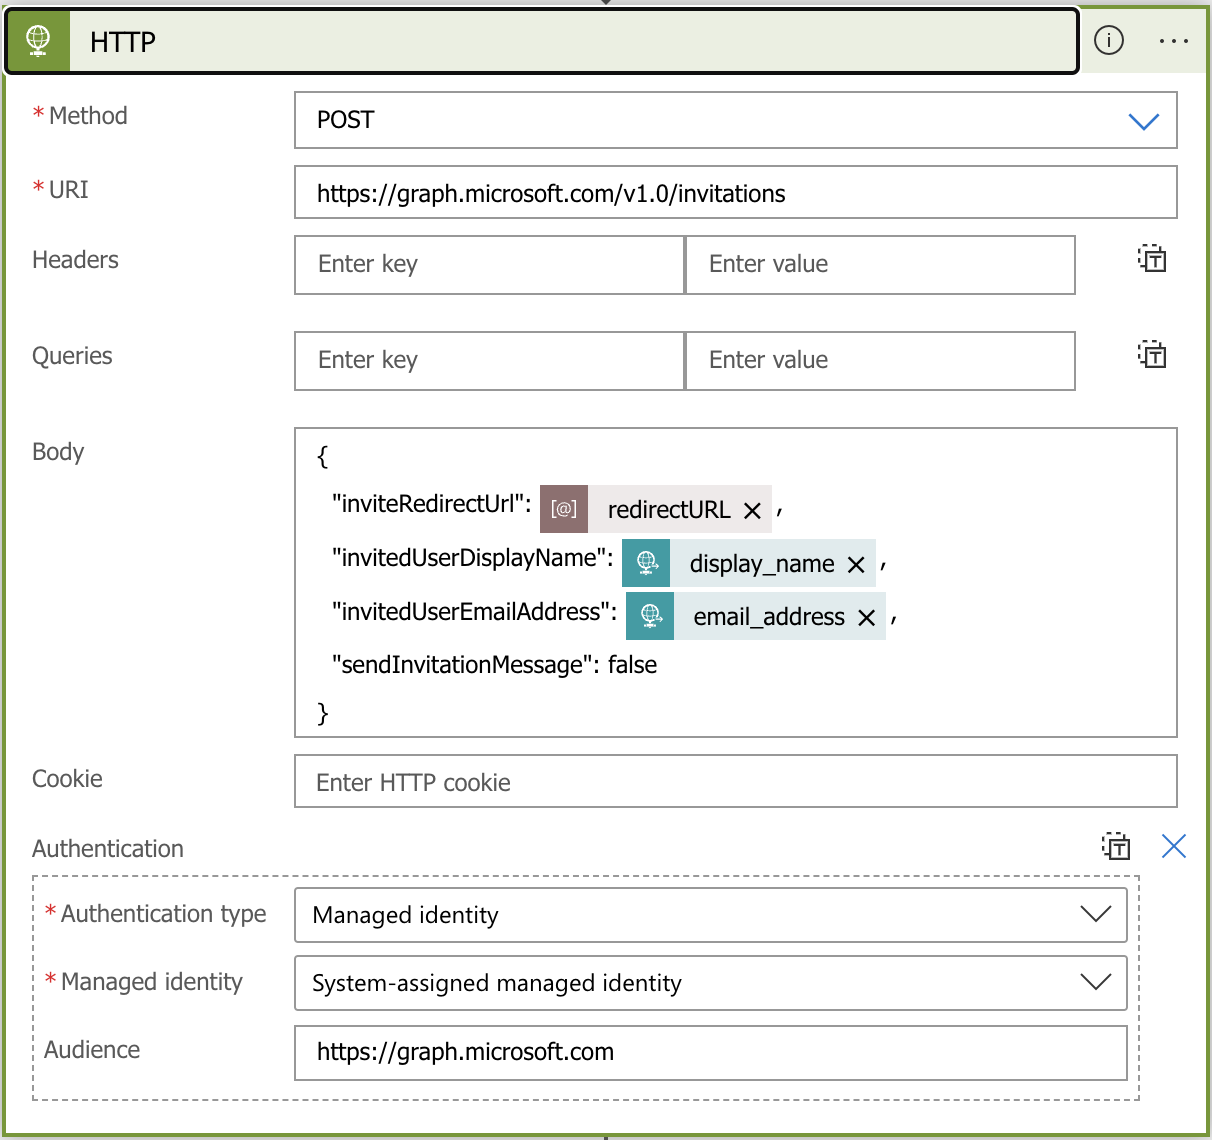
| Method | POST |
|---|---|
| Body | Parsed information from the incoming HTTP request to create the invitation to Microsoft Graph. The key part here is to set sendInvitationMessage to false. Which will not send the default Microsoft invitation email. |
| Authentication | You can use several different authentication methods. In my case I wanted to make this easy to manage into the future so I used a system-assigned managed identity assigned to the Logic App |
Permissions
Enable a Managed Identity on the logic app.
| Permission Type | Permission |
|---|---|
| Application | User.Invite.All, User.ReadWrite.All, Directory.ReadWrite.All |
Find more detailed documents on the required permissions to use Microsoft Graph to create invitations.
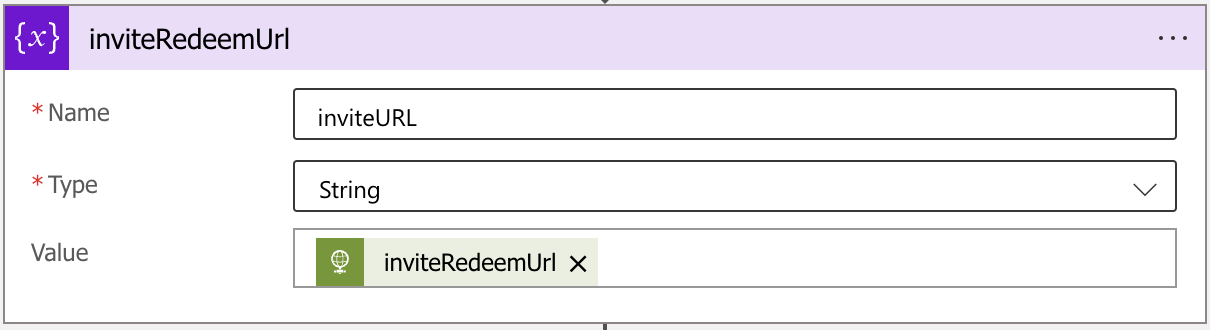
Invite URL Variable
Create a variable task to capture the ‘inviteURL’ from the Microsoft Graph HTTP response. The variable will be used in the follow step to update the body of the email.
Generate Invitation Email
I use Logic App Variable task to define and modify the HTML for the email box. The HTML and previous variables are merged together and ready to use in the next step.
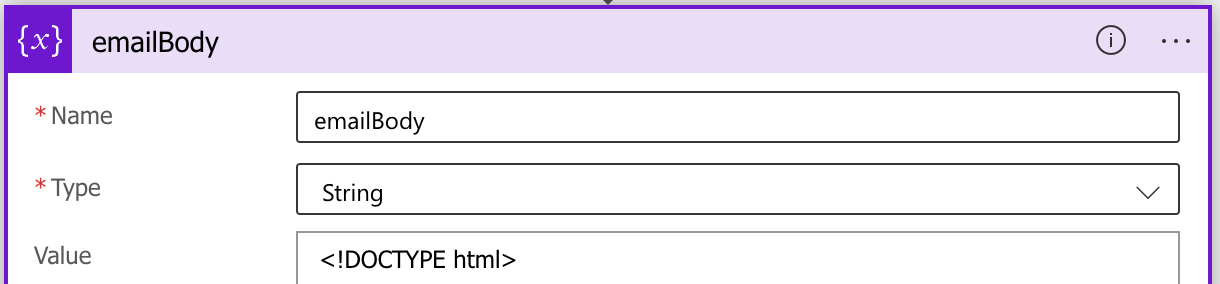
| Name | unique variable name, i used ‘emailbody’ |
|---|---|
| Type | String |
| Value | HTML block for the email body. With includes for the inviteURL (@{variables(’ inviteURL’)}) |
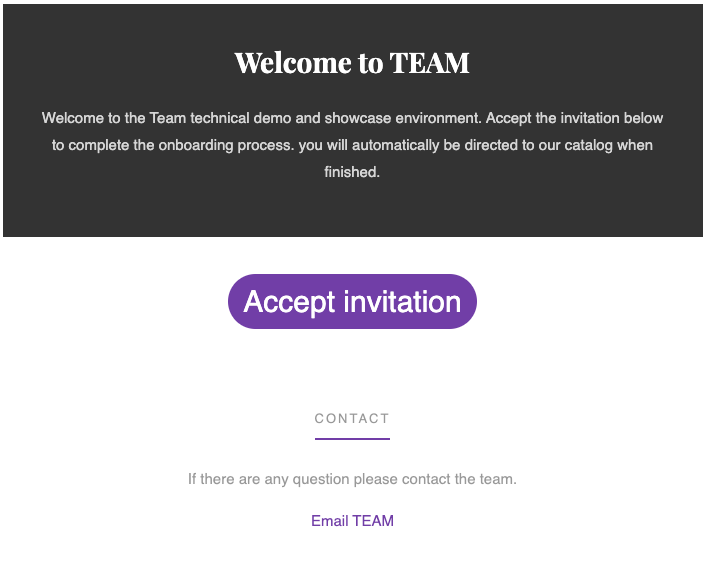
Value: Email Body HTML Block
<tr>
  <td class="bg_dark email-section" style="text-align:center;">
    <div class="heading-section heading-section-white">
      <h2>Welcome to TEAM</h2>
      <p>
              Welcome to the Team technical demo and showcase environment. Accept the invitation below to complete the onboarding process.
              you will automatically be directed to our catalog when finished.
          </p>
    </div>
  </td>
</tr>
<tr>
  <td class="bg_white email-section">
    <div class="heading-section" style="text-align: center; padding: 0 30px; font-size: 30px;">
              <a href="@{variables(' inviteURL')}" target="_blank" class="btn btn-primary h2">Accept invitation</a>
    </div>
        </td>
      </tr>
<tr>
  <td class="bg_white email-section">
    <div class="heading-section" style="text-align: center; padding: 0 30px;">
      <span class="subheading">Contact</span>
            <p>If there are any question please contact the team.</p>
            <a href="mailto:#" class="btn">Email TEAM</a>
    </div>
        </td>
      </tr>
This block is only the HTML that contains the inputs from the Logic App workflow. I used a starter template from Bootstrap Email and added my bits where needed.
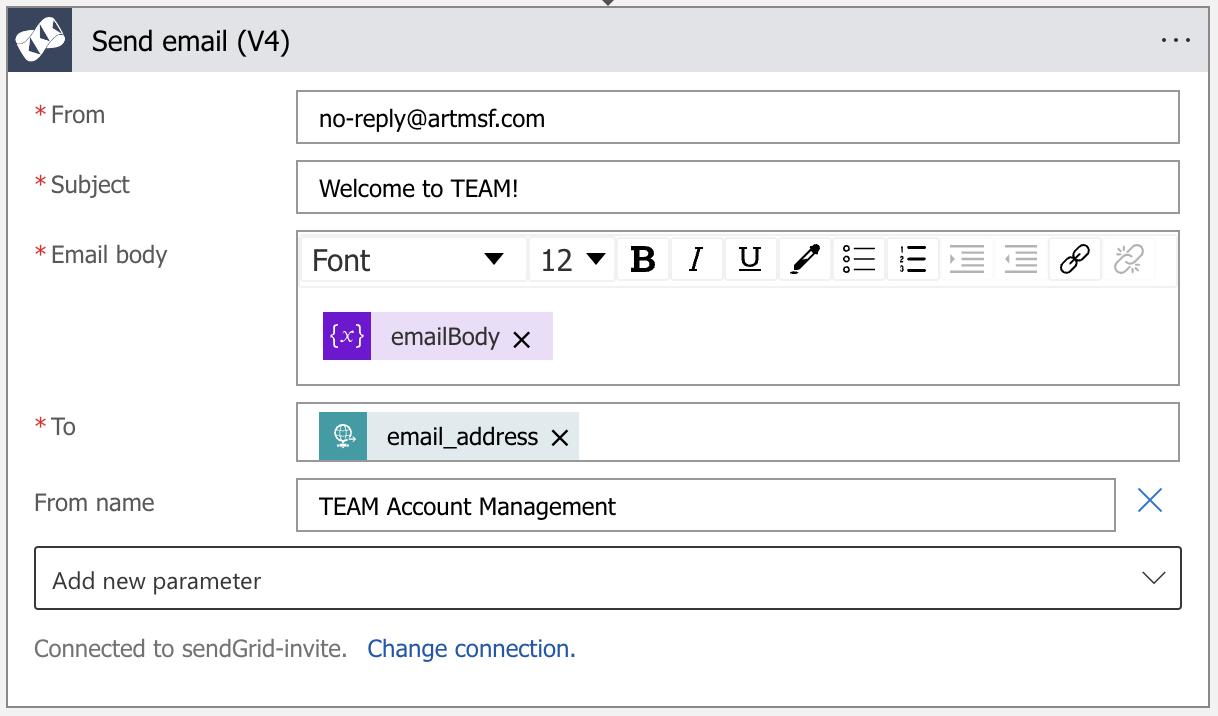
Send Email
The SendGrid Send Email services built-in to Azure includes Logic App tasks that can send email with out all of the extra headache of try and manage sending email on its own. There are additional steps required to get your SendGrid account up and running before you can use the tasks. Follow the steps and create an API key, that will be used to authorize the task.
I put this together just before the release of the Azure Communication Email Service. There are logic app tasks now available for the new service, and they look a bit easier. Shouldn't be a problem to swap one for the other. I just haven't had the chance.
Wrap it all Up
With all these pieces in place, we can send a custom email invitation to the external user. This email can be tailored to fit your organization’s branding or the specific needs of your application.
From here, we’ve got our own API for creating invitations. The next step is to build a front end that calls the Logic App to kick off the process. The beauty of it? That front end can be anything you want—whether it’s a sleek web app, a mobile interface, or even a chatbot. The possibilities are endless, so get creative.