One Public IP: Unlocking VNET Integration and NAT Gateways for Secure Azure Function Traffic
Unlock the power of VNET integration with Azure functions. Learn how to set up a NAT gateway and ensure all traffic originates from a single public IP address in this step-by-step guide.
Azure Function Apps have been a reliable workhorse for serverless computing, excelling at running small code snippets with ease. However, when it comes to connecting your functions to external services that still rely on legacy access control methods – like IP address whitelisting – things can get hairy.
Out of the box, Functions will provide you with a list of potential public IPs that could be used as an origin IP. Sounds good in theory, right? But in reality, the constant flux of these IPs (which can change without notice) and the sheer number of shared IPs across multiple resources and customers makes whitelisting a notoriously finicky process.
Meet your new BFF (Best Function Friend): NAT Gateway By leveraging this services, we’re going to show you how to tame the wild west of outbound connections from your Azure Functions. Imagine having a single, reliable public IP address that’s all yours – one you know inside out and can control with ease. No more worrying about unpredictable origins or trying to herd a bunch of stray IPs. With this game-changing trick, you’ll be the master of your own domain (or at least, your function’s domain)!
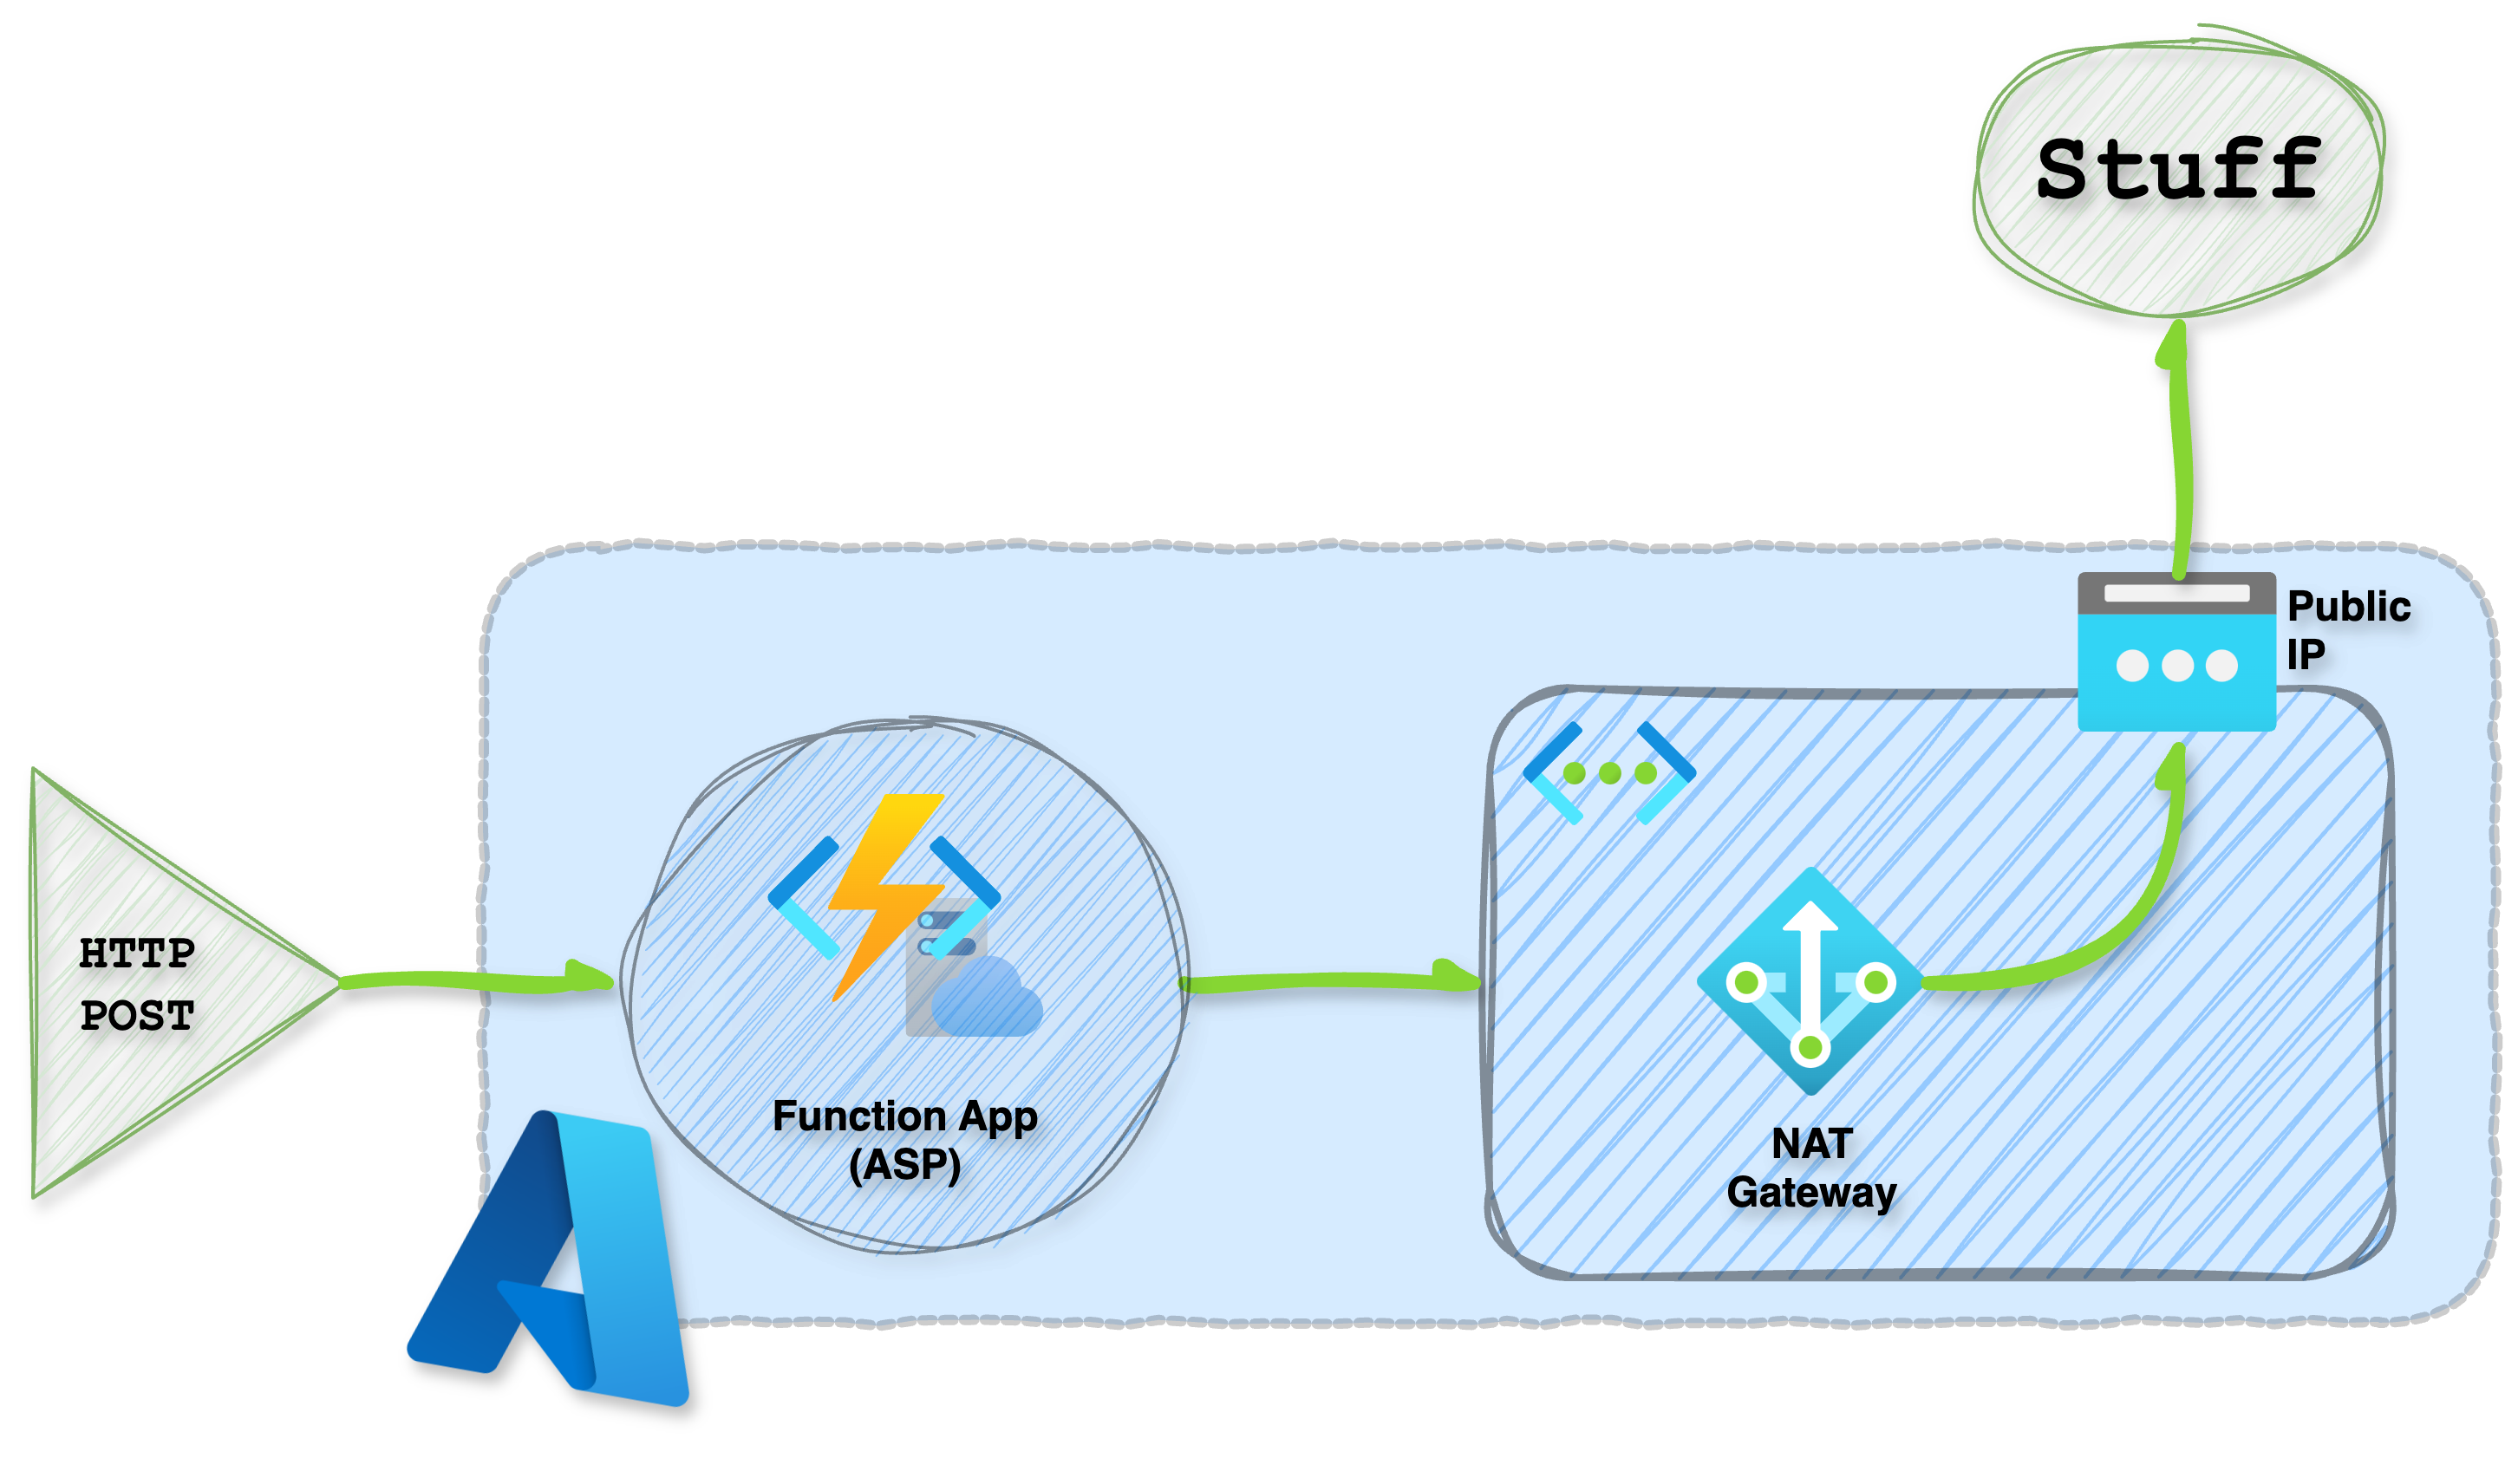
Architecture
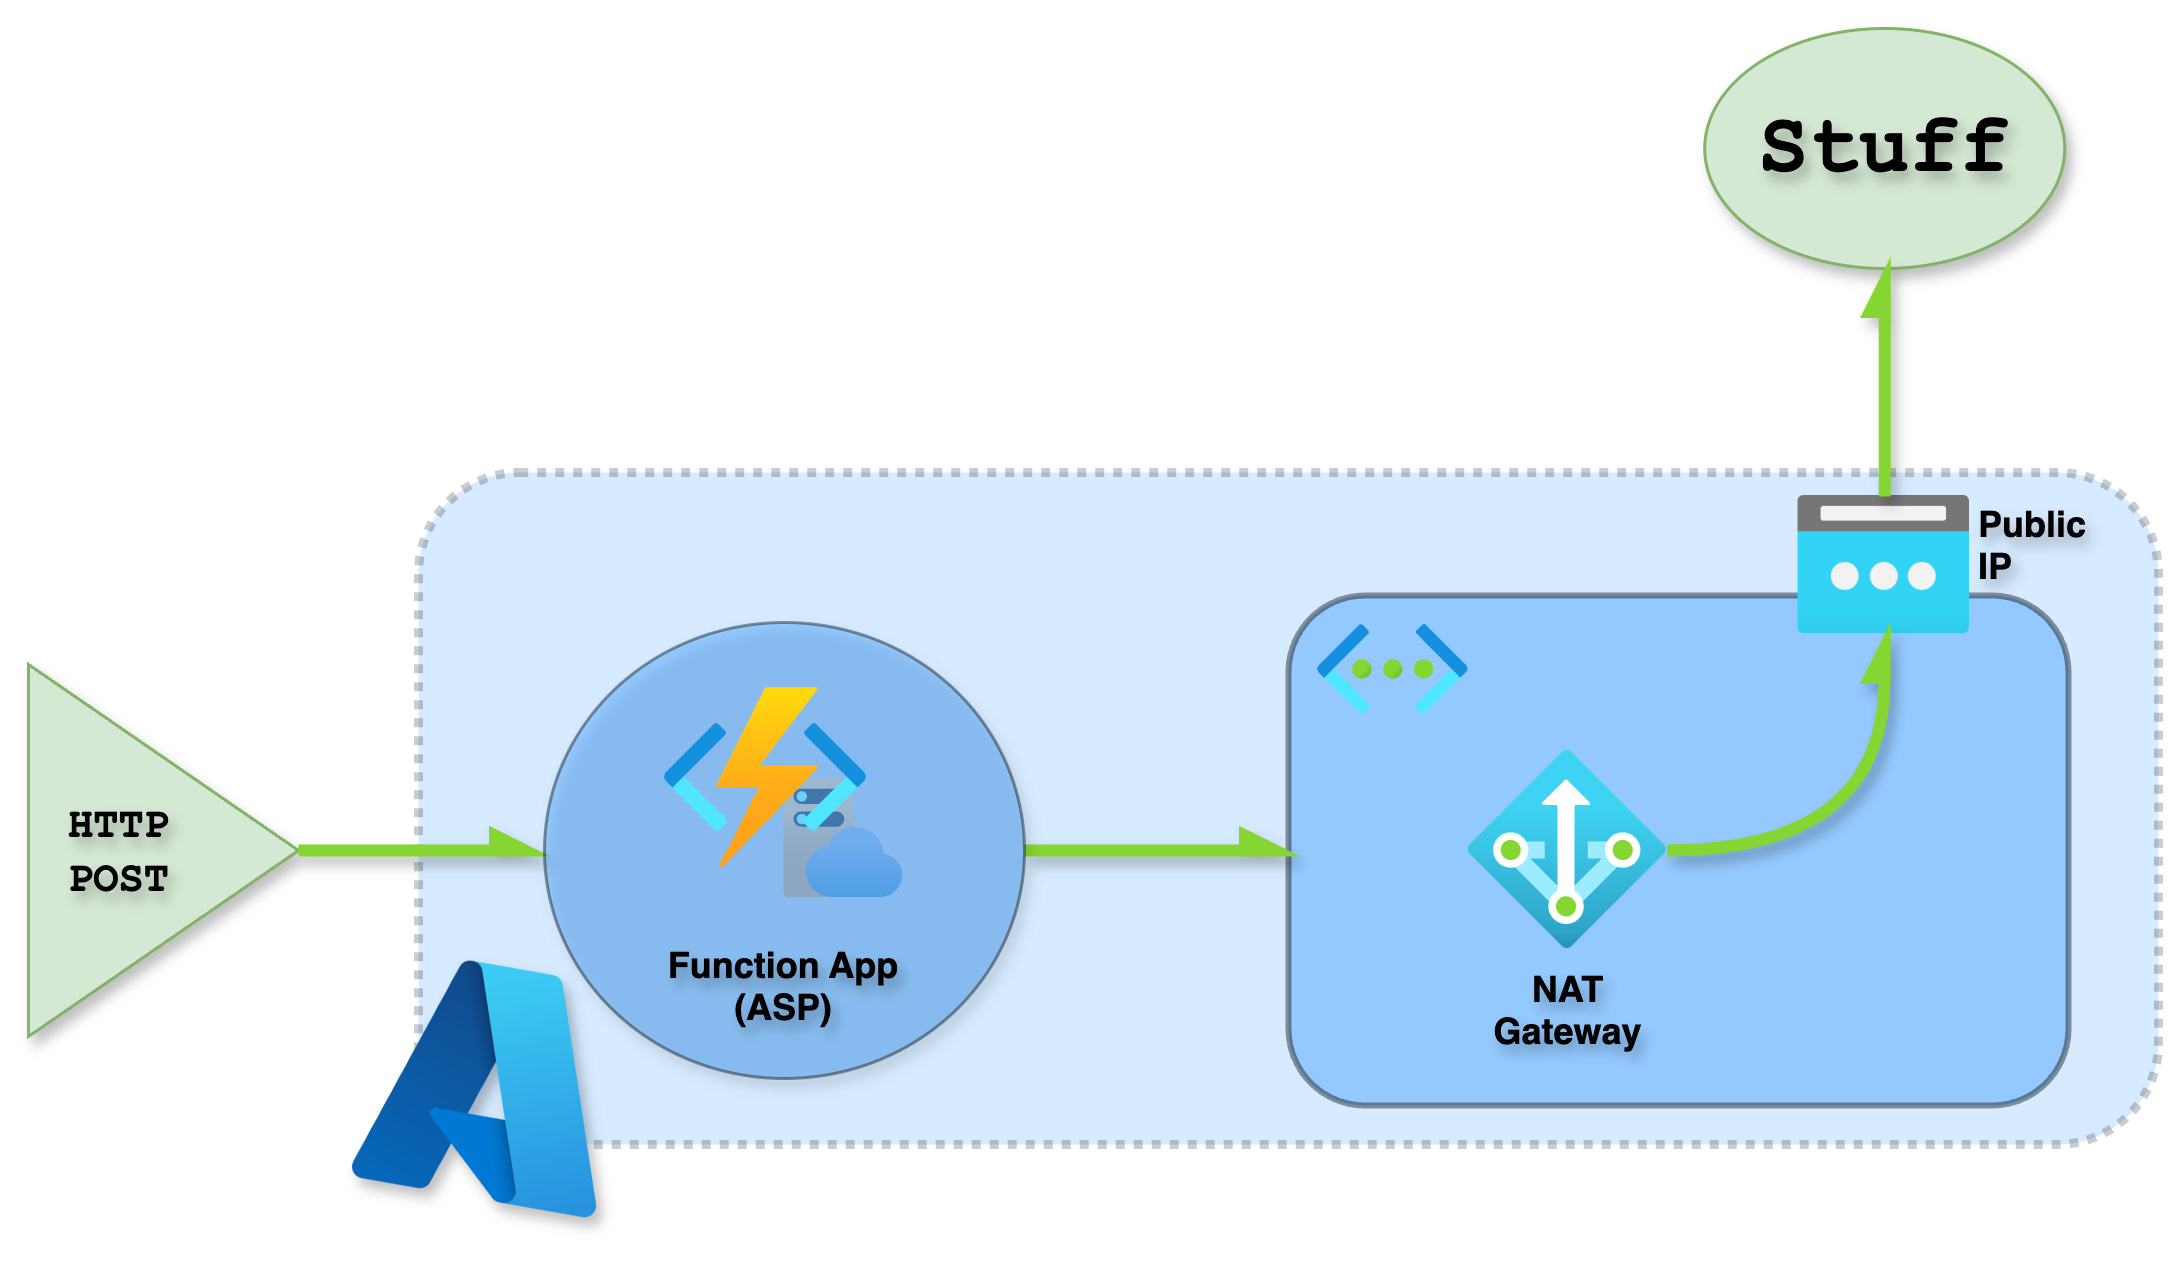
So, how do we make this magic happen? We’ll need to bring in some extra network ninjas to join the party. First, our Function App gets configured with VNET integration, which connects it to its own private virtual network – think of it like a secret clubhouse for your functions. As a result, outbound connections from the function get routed through this VNET and inherit its networking and DNS settings.
Next, we associate a NAT Gateway with the subnet used for VNET integration and pair it with a static public IP address that’s all our own. It’s like having a special identity card for our Function App, making it easy to track and manage those outbound connections.
Pro tip: when setting up your virtual network for this process, consider keeping it separate from the rest of your organization's networks. This will help you avoid any potential IP address conflicts or overlaps, making it easier to manage and maintain. Think of it like having a dedicated lane on the information superhighway – just for this process!
Requirements
The secret to this solution is simplicity. You’ll need only three Azure resources and a pinch of expertise to bring it all together. No complicated recipes or special equipment required – just the basics, done well!
- Azure Function App (w/ VNET integration)
- Virtual Network
- NAT Gateway
Deployment
The magic happens when you deploy! To make it easy, I’ve crafted a Terraform template that handles all the grunt work for you. With just a few commands, you’ll be up and running in no time – without having to lift a finger (or write a single line of code)!
Supporting Resources
To get started, let’s lay the foundation for our solution. This means creating the essential resources: a resource group, virtual network, and subnet.
Don't forget to delegate the subnet to the VNET later on - it's an important step that'll ensure everything flows smoothly!
# Create Resource Group (optional)
resource "azurerm_resource_group" "core" {
  name        = "rg-funcnat-${var.location}-${random_string.random.result}"
  location    = var.location
  tags        = var.tags
}

# Virtual network
resource "azurerm_virtual_network" "vnet" {
	name                = "vnet-${random_string.random.result}"
	location            = azurerm_resource_group.core.location
	resource_group_name = azurerm_resource_group.core.name
	address_space       = ["10.0.0.0/16"]
	tags                = var.tags
}

resource "azurerm_subnet" "subnet" {
	name                 = "subnet-${random_string.random.result}"
	resource_group_name  = azurerm_resource_group.core.name
	virtual_network_name = azurerm_virtual_network.vnet.name
	address_prefixes     = ["10.0.1.0/24"]
	# delegation for service plan
	delegation {
		name = "funcasp"
		service_delegation {
			name    = "Microsoft.Web/serverFarms"
			actions = ["Microsoft.Network/virtualNetworks/subnets/action"]
		}
	}
}
Function App
Now it’s time to bring your Function App to life! This involves deploying a standard App Service Plan for computing power and, of course, the Function App itself.
The real magic happens when you enable VNET integration on the Function App – just specify the ‘virtual_network_subnet_id’ option to unlock this feature.
VNET integration has some strict requirements! You'll need to deploy your Function App with a specific SKU that supports this feature, and you'll also need an App Service backend to make it work. So, if you're planning on using a Consumption-based Function App, you'll need to choose a different approach
# Storage Account for Azure Function
resource "azurerm_storage_account" "funcstore" {
	name                     = "funcstore${random_string.random.result}"
	resource_group_name      = azurerm_resource_group.core.name
	location                 = azurerm_resource_group.core.location
	account_tier             = "Standard"
	account_replication_type = "LRS"
	tags                     = var.tags
}

# App Service Plan for Azure Function
resource "azurerm_service_plan" "funcasp" {
	name                = "funcasp-${random_string.random.result}"
	location            = azurerm_resource_group.core.location
	resource_group_name = azurerm_resource_group.core.name
	tags                = var.tags
	os_type = "Linux"
	sku_name = "P1v2"
}

# Azure Function App
resource "azurerm_linux_function_app" "func" {
	name                      = "func-${random_string.random.result}"
	location                  = azurerm_resource_group.core.location
	resource_group_name       = azurerm_resource_group.core.name
	tags                      = var.tags

	service_plan_id 			= azurerm_service_plan.funcasp.id
	storage_account_name      	= azurerm_storage_account.funcstore.name
	storage_account_access_key 	= azurerm_storage_account.funcstore.primary_access_key
	virtual_network_subnet_id 	= azurerm_subnet.subnet.id
	https_only                  = true

	app_settings = {}
	site_config {}
}
NAT Gateway
The grand finale! To complete our deployment, we need to bring in the star of the show: the NAT Gateway.
First, we’ll create a static public IP resource – think of it as your trusty sidekick that always has your back. This will give you a single, reliable IP address that won’t change unless catastrophe strikes (knock on wood!).
Next, we’ll associate that subnet with our NAT Gateway, and suddenly all outbound traffic from that subnet will be routed through the paired public IP address. It’s like having a secret agent working behind the scenes to make sure your traffic is always disguised as coming from this single, known IP address!
# Nat Gateway public ip
resource "azurerm_public_ip" "natpip" {
	name                = "natpip-${random_string.random.result}"
	resource_group_name = azurerm_resource_group.core.name
	location            = azurerm_resource_group.core.location
	sku                 = "Standard"
	allocation_method   = "Static"
	tags                = var.tags
}

# Nat Gateway
resource "azurerm_nat_gateway" "natgw" {
	name 			    = "natgw-${random_string.random.result}"
	resource_group_name = azurerm_resource_group.core.name
	location            = azurerm_resource_group.core.location
	sku_name 		    = "Standard"
}

# Nat Gateway IP Configuration
resource "azurerm_nat_gateway_public_ip_association" "natgw-ip" {
	nat_gateway_id 			= azurerm_nat_gateway.natgw.id
	public_ip_address_id 	= azurerm_public_ip.natpip.id

}

# NAT Gateway subnet association
resource "azurerm_subnet_nat_gateway_association" "natgw-subnet"	{
	nat_gateway_id 	= azurerm_nat_gateway.natgw.id
	subnet_id 		= azurerm_subnet.subnet.id
}
Testing
The moment of truth! It’s time to put our deployment through its paces with some thorough testing.
To make things easy, I’ve cooked up a simple Python function app that’s ready to roll. All it does is ping myip.com and report back what it sees as your original public IP address. When you trigger this function via HTTP, you should get a response that matches the public IP resource you set up earlier. If everything checks out, you’ll know your setup is solid!
import azure.functions as func
import requests
import logging

app = func.FunctionApp(http_auth_level=func.AuthLevel.ADMIN)

@app.route(route="http_trigger")
def http_trigger(req: func.HttpRequest) -> func.HttpResponse:
    logging.info('Python HTTP trigger function processed a request.')

    response = requests.get('http://api.myip.com')
    if response.status_code == 200:
        return func.HttpResponse(response.text)
    else:
        return func.HttpResponse(
            "Failed to get data from api.myip.com",
            status_code=response.status_code
        )